Showing posts with label side dishes. Show all posts

Tuesday, January 11, 2011

Super Simple Sugar Glazed Pork Ribs

I have a 9 year old son that dearly loves ribs.  He has begged for them repeatedly in the last few weeks, ignoring my protestations that it's too darn cold to grill them outside.  Not to mention that it's dark at 4:30 p.m.  He went grocery shopping with me on Saturday night, a really exciting kid date to be sure, and steered me toward the ribs when we got to the meat section.  OK, OK, I can take a hint.  He likes bone in, but I don't, so I exercised my mom-veto powers and went for the boneless country style pork ribs. 

One of my chief complaints about meat in general is that it can easily wind up tough and chewy.  I put my trusty crock pot to use for this recipe, and finished it off with the broiler and wound up with perfect ribs.  They didn't fall apart like I was afraid, but were tender, moist, and had a nicely caramelized glaze on the outside.  I neglected to take a picture before my ravenous kids dug in, and after very enthusiastic reviews, I hurried and snapped this one of the lone ranger still left on the pan.  It wasn't even the best looking one of the bunch, but it's better than no picture at all.  My 3 year old ate two whole ribs herself, and every person at the table enthusiastically cleaned their plates.  I served it with a side of gouda and garlic infused mashed potatoes and buttery sweet corn.  It's definitely staying on the favorites list.

Super Simple Sugar Glazed Pork Ribs

2 pounds boneless country style pork ribs
1 cup barbecue sauce of your choice (we like Jack Daniel's Honey Smokehouse)
1/4 cup brown sugar

Place your ribs in an appropriately sized crock pot (I used my standard round that I'm guessing is 2-3 quarts).  Pour the sauce over them and toss to coat evenly.  Cook on high for 4 hours.  Line a baking pan with foil and use tongs to pull the ribs out of the crock pot and space them evenly on the baking sheet.  Sprinkle brown sugar generously over each rib and heat under the broiler for 3-4 minutes, until the sugar is bubbly and golden.  Use tongs to flip the ribs over and sprinkle the newly exposed bottom with more brown sugar.  Broil again for 3-4 minutes.  Serve promptly with additional barbecue sauce.  (This will serve 4-6 people, depending on how big appetites are.)

Garlic n' Gouda Spuds
6 large redskin potatoes, peeled if desired, and diced into 1/2" chunks
water
1 T. salt
~~~
4 T. butter
1/2 cup shredded gouda cheese, preferably aged gouda for more flavor
1/2 t. freshly ground pepper
1 t. garlic powder (not garlic salt!)

Boil the potatoes in enough water to cover them completely with the salt added to the cook water until they are fork tender.  Drain the water, add the butter, and mash until fluffy.  Mash in the cheese, pepper and garlic powder last, and serve immediately.

Monday, January 10, 2011

Finger Food

Tonight I was in the mood for kid food, except that I can't really bring myself to stomach chicken nuggets from the freezer.  So I dug around a bit in the pantry and came up with a  more grown up version, and paired them with oven roasted sweet potato fries.  My big kids cleaned their plates happily.  I didn't particularly go out of my way to make the nugget coating nutritious because I just grabbed what surfaced first, but I am quite certain you could add some ground flax seed and whole grain cracker crumbs to the mix to nudge the fiber and vitamin content up.

Oven Roasted Sweet Potato Fries

2-3 large yams or sweet potatoes
olive oil
kosher salt
freshly ground pepper

Peel the yams and slice into fries, roughly 1/2"x1/2"x4".  Drizzle with olive oil and toss to coat.  Spread out in a single layer on a 10"x15" baking sheet and sprinkle with salt and pepper.  Roast at 450 degrees for 35-45 minutes to desired doneness, stirring once in the middle.

Grown Up Chicken Strips

3 chicken breasts, sliced across the grain into 1/2" thick strips

2 eggs
1/2 cup plain yogurt
1 t. smoked paprika
2 t. garlic powder
1 t. salt
1/2 t. freshly ground pepper

1 cup panko bread crumbs
1 cup smashed Ritz crackers
1/2 cup grated parmesan cheese

Olive oil

Whisk the egg, yogurt and seasonings together until well combined.  Stir the crumbs and cheese together until well combined.  Pour each mixture into a pie plate.  Heat up a large skillet over medium heat and add 3 T. olive oil.  Dip each piece of chicken into the yogurt mixture, turning to coat evenly, then roll it in the crumb mixture.  Fry on each side for 4-5 minutes, or until the crumb coating is golden brown and juices run clear.  Remove to a paper towel on a wire rack to drain, then serve with your favorite dipping sauce.

Sunday, November 28, 2010

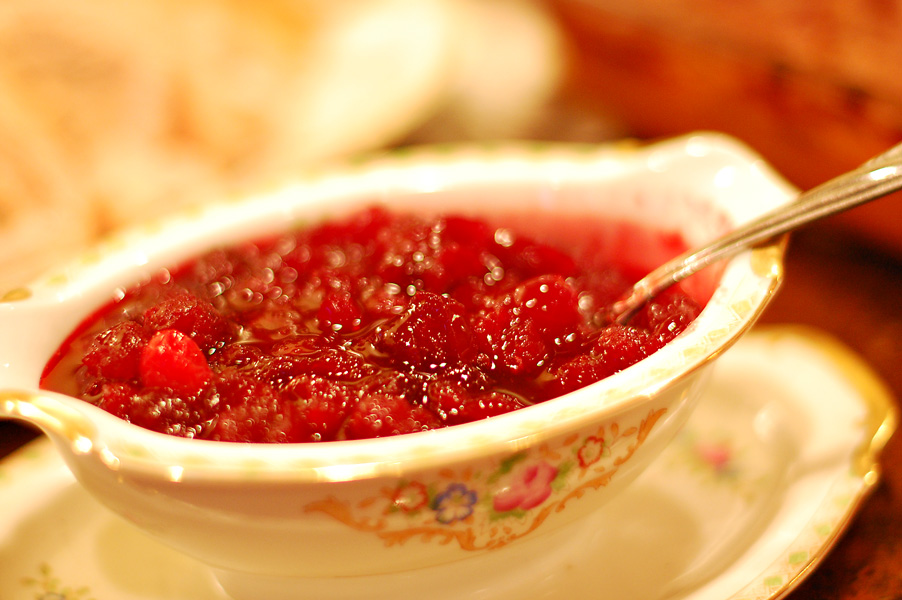
Delicious cranberry sauce

Whenever I see a gelatinous heap of cranberry stuff with the can rib impressions still clearly visible I want to cry out in pain.  Why, for the love of all that is holy, would you eat that when it is so simple to make it from scratch?  I personally like mine chunky anyway.  I look forward to the post-Thanksgiving sandwich of turkey, lettuce, mayo and a generous helping of whole berry cranberry sauce on toasted hearty bread all year long.  It just isn't the same with the canned stuff.

This literally takes about 2 minutes of effort, 15 minutes of total prep time, and is easily made in advance.  I have made different variations each year, and was pleased with how it came out this year.  I used brown sugar instead of white, added some orange zest and juice, and my usual top secret pinch of cloves.  Good stuff.

Heidi's 2010 Cranberry Sauce

1 package fresh cranberries  (I'm guessing it's about 4 cups of fresh berries)
1 cup brown sugar
1/2 cup water
zest of one orange
juice of one orange
pinch of cloves

Combine all of the ingredients in a medium saucepan  and stir.  Bring up to a low boil over medium heat and cook for 10 minutes.  Remove from heat and allow to cool at room temperature for at least an hour before refrigerating.  This may be made up to three days in advance, leaving you free to worry about other things on Thanksgiving day.

Sunday, June 20, 2010

Dutch Oven Heaven - Ribs, Potatoes and Apple Crisp

We went camping this weekend with my hubby's family.  Perfect time to bust out the dutch ovens.  We have one much loved and well used Lodge 12" oven, and I finally opened the box of a Cabela's brand 12" oven that his parents gave us for Christmas a couple of years ago.  While Lodge has always been the go-to brand of choice for me, I was very impressed by the quality of the Cabela's oven.  It has the awesome bonus feature of the lid being shaped nicely on the inside so that it can be used as a griddle.  My point with this rambling is that it is worth it to spend good money on a solid oven.  If you see a no-name brand one for sale for 20 bucks, run the other way.  It will drive you crazy and not yield the results you hope for.

I am not a scientific dutch ovener.  I have a few cookbooks that I've been given over the years in which the authors expound on the number of coals on top and bottom to achieve the right cooking temperature, rotating the lid every twenty minutes, knocking the ash off, using only a particular brand of coals...blah blah blah.  That takes the fun out if it, in my opinion!  Just like the way I cook at home, I especially do dutch oven by the seat of my pants and 90% of the time it works just fine.  The other 10% of the time it still tastes good because something about being outside = extra hungry.

I would like to bring up a couple of basic points for success, though.  Work in a well ventilated area.  We had a deep concrete fire pit at this camp site that we didn't use because the air flow would have been poor and taken the coals longer to heat up.  We simply laid down a square of heavy duty foil and heaped half a big bag of match light coals up.  Purists wouldn't use match light, but I'm not a purist :).  They work just fine and are far easier to get going than plain briquets.  I had the men fire up the coals while I prepped the food, and by the time the food was ready to go, the coals were too.  Perfect.

You need to make sure you have a pair of heavy duty leather gloves and some tongs to move coals around.  I have a lid lifter tool as well, which I think is on the "really nice to have but you can get by without it" list.  The tongs I use are my favorite el-cheapo stainless steel all purpose kitchen tongs.

In general, you will need more coals on top than on bottom since there is dead air space to heat between the top and the food.  For the things I cook, I just put as many coals as I can fit on top and bottom, evenly spaced.  Especially at higher altitudes, you need as many as you can get.  I don't have experience cooking dutch oven below 4,500 feet, so I can't give advice on the number of coals needed for you lowlanders.

If you're doing a few pots at once, stack them.  I check the food every 20-30 minutes and change the stack position if necessary.
Boneless Pork Ribs

5 pounds boneless pork ribs
1 large sweet vidalia onion
2 cups of your favorite barbecue sauce (we love Jack Daniel's Honey Smokehouse and Sweet Baby Ray's)

Cut the onion into thick slices, then quarter the circles so that you are left with good size chunks.  Place the ribs and onion slices into a 12" dutch oven and douse them in sauce.  Stir it around until everything is thoroughly coated.  Put the lid on, place it over a bed of coals, cover the lid with coals and let it cook merrily away.  Stir it after 45 or so minutes, then check it every 20 minutes or so thereafter and stir if needed.  Cook time will be 1 - 1.5 hours, depending on how hot your coals are.  You want them to be fork tender, so the longer they simmer, the more tender they'll be.
Awesome Potatoes

2 bags frozen O'brien style potatoes
2 cups carrot "pennies"
1 sweet vidalia onion, diced
1 pound bacon
2-3 T. butter or oil
salt and pepper
2 cups shredded cheddar jack cheese

Heat a 12" dutch oven over a bed of coals and toss the bacon in.  Cook until browned, then remove to dice.  Dump in the potatoes, carrots and onion and stir around until evenly coated with bacon grease.  If there wasn't enough grease left over, add another 2-3 T. butter or oil as needed and stir well.  Sprinkle with salt and pepper, stir in the diced bacon and put the lid on.  Cover the lid with coals and let cook for 30 minutes.  Stir, and cook for another 20 minutes.  The vegetables should be tender at this point and lightly golden.  Sprinkle the cheese over the top in an even layer and put the lid back on for another 10-15 minutes.
Feed the thundering herd of hungry people, and chances are good that this is all you'll have left over.  The quantities in these recipes fed a crowd of 13, with 4 of those people being little kids that didn't eat much. 

Apple Crisp

6 large apples of assorted varieties (jonagold, golden delicious, gala, granny smith, etc.)
3 T. flour
1 T. cinnamon
4 T. butter, cubed
Cloves, nutmeg, ginger as desired

Topping:
1 stick butter, room temperature
1 cup whole wheat or all purpose flour
1 1/2 cups quick cooking oats
1 1/2 cups brown sugar
1 T. cinnamon

Stir together the topping ingredients except for the butter until well combined, then cut in the butter.  I often do this part with my hands to make sure that the butter gets evenly distributed.  I also usually make the topping in advance to make prep easier at the campsite.

Thinly slice the apples.  In a small bowl, stir together the flour and spices.  Sprinkle over the apple slices and toss gently to coat.  Dot butter over the apples, then layer the topping evenly over all of it.

Lay on a bed of coals and place a layer on top as well.  Cook for 30 minutes, then check apple tenderness.  Cook for up to an additional 20 minutes until the topping is nicely crisp and brown and the apples are fork tender.  Serve warm with ice cream.

Thursday, March 25, 2010

Cheddar Bacon Cornbread Muffins

These are a fantastic accompaniment for a hearty bowl of soup.  I took the basic cornbread muffin recipe out of my trusty Better Homes & Gardens cookbook and simply added some whole kernel corn, shredded bacon and cheddar cheese with very pleasing results.  I think they'd be awesome with pepper jack cheese, but in deference to the wimpy taste buds in my house I stuck with cheddar.  I ate the last one the next day and it was nice and moist.  I'll definitely make these again.

Cheddar Bacon Cornbread Muffins

1 cup all purpose flour
3/4 cup cornmeal (I used yellow)
2-3 T. sugar
2 1/2 t. baking powder
3/4 t. salt
2 beaten eggs
1 cup milk
1/4 cup cooking oil
1/2 cup whole kernel corn, fresh or canned, drained
1/4 cup shredded real bacon bits
3/4 cup shredded cheddar cheese

Preheat the oven to 400 degrees and generously mist a regular sized muffin pan with cooking spray.  In a medium bowl, stir together the dry ingredients.  In a small bowl, combine the eggs, milk and oil.  Add the liquid to the flour mixture all at once and stir until just moistened.  Fold in the corn, bacon and cheddar cheese and spoon equal amounts into the muffin cups.  Bake for 15 minutes or until edges are lightly golden brown and the tops spring back when you depress lightly with your finger.  Serve immediately or remove to a wire rack to cool.

Friday, November 27, 2009

The best of the feast - perfect sweet potato casserole


Click here to read about my Thanksgiving dinner, including a few minor disasters, and links to recipes that I used. Lest you all think that I'm some amazing cook that never makes mistakes, I'd like to make it very clear right now that it is rare that I get through a big meal prep without a spill, boil over or some other mess. I freely admit that I'm a sloppy cook that rarely follows recipes exactly, which usually works out and sometimes doesn't. I just usually manage to pull things together in the end and put a happy face on it.
~~~
We had a wonderful dinner yesterday. The absolute star of the show was the sweet potato casserole I made. I have had many versions over the years. Kinds with corn syrup and marshmallows crusted on top. Bland ones with just a dab of butter and cinnamon. Greasy ones floating in so much butter that you can literally feel your arteries hardening as you swallow (but boy does it taste good...!) I think a lot of them do a disservice to yams. They're a naturally sweet and flavorful treat all by themselves and really don't need a ton of adornment to make them excellent. I browsed the internet for recipes and wound up modifying a few of them to reduce the amount of sugar and butter added to come up with the finished product. My 8 year old son deemed it perfect, as did everyone else at the table.
~~~
The Perfect Sweet Potato Casserole
~~~
4 large red yams, baked until soft*
1/4 - 1/3 cup packed brown sugar
1 egg, beaten
1 T. vanilla
1 t. cinnamon
1/2 c. milk
4 T. butter, room temperature
Topping:
1/2 cup brown sugar
1/3 cup flour
4 T. butter, room temperature
1 cup chopped pecans
~~~
*My recommendation is to bake the yams the day before. Simply wrap them in foil, poke a knife in to allow them to vent, and bake at 375 for an hour. Refrigerate over night, then they'll be ready to use in the morning. To prepare the casserole, slice each yam in half lengthwise and pop the good stuff right out of the skin right into a 2 quart casserole dish. It'll literally just fall out, no need to peel.
~~~
Mash the yams with a potato masher until no big lumps remain, then mash in the remaining filling ingredients. Smooth out the surface. In a small bowl, combine the brown sugar, flour, and soft butter and work it with your fingers until well combined and clumps form. Work in most of the pecans, then sprinkle evenly over the filling. Sprinkle the remaining nuts on top. Bake at 350 for 30-40 minutes, until the filling is bubbling and the topping is golden.

Thursday, May 7, 2009

Tart and tangy broccoli salad

Like most salads, everyone has their favorite way to do this one. I have a few particular biases about salads in general. I like flavor and texture contrasts, lots of color, a high ratio of goodies to the salad base, and not overwhelming amounts of dressing. Broccoli salad is one of my favorites because it is a perfect marriage of sweet, salty, crunchy, and tangy. Plus it's a feast for the eyes with all of the rich colors and absolutely loaded with nutrition. It's best if it sits in the fridge for a couple of hours to let the flavors mingle. I personally don't like to put onions in it, because they can overpower the other flavors, but if I did, I'd use shallots because they are more mild. I know that some people like to run the ingredients through a food processor to save time, but I just can't do it. You lose so much in the way of texture when you do it, plus it's reminiscent of baby food that way.

Here's what I stirred up today for a dinner at church. As always, every time I make something, it comes out differently because I'm terrible at following even my own recipes. This batch was too my liking.

8 cups chopped broccoli florets
1 cup red grapes, cut in half
1 cup craisins
1 cup sunflower seeds
1/2 cup real shredded bacon
1 cup light mayonnaise
1/3 cup red wine vinegar (may substitute rice wine vinegar)
2 T. sugar

Mix together the florets, grapes, craisins, sunflower seeds and bacon in a medium mixing bowel. In a small mixing bowel, mix the mayo, vinegar and sugar. If it is too tangy, add a little more sugar to taste or back off on the vinegar by a couple of tablespoons. Stir the dressing into the veggies and allow to marinate in the fridge for 2-3 hours before serving.

**I have substituted cashews for the sunflower seeds with good results, and have also added shredded swiss cheese.

Saturday, February 28, 2009

The perfect side dish - Roasted Vegetables

This is one of my favorite side dishes because it is very versatile, goes with all types of meats, and best of all it practically makes itself with very little intervention during cooking.
The proportions for this depends entirely on how many people you'll be feeding. If it's just my family, I'll do a small 11x7 pan. I was making dinner for two other families in addition to mine, so I filled a whole jelly roll sheet pan. Divide your vegetables into two categories - hard root types that need to cook a while and wimpier veggies that'll shrivel up and die if you leave them in the oven for an hour (bell peppers and asparagus).
I've found that I can get even the pickiest eaters to try things they haven't eaten before like parsnips and yams and they find them to be pleasant. So this is your chance. Pull out something new. Here are our favorites:
carrots
red skin potatoes
yukon gold potatoes
yams/sweet potatoes
parsnips
shallots
garlic
asparagus
red peppers
Preheat the oven to 425 while you prepare the vegetables by cutting them into roughly 1" chunks. Spray your pan with cooking spray. Pour all the "hard" veggies into a large bowl and drizzle olive oil all over them until they are all uniformly coated. Sprinkle a healthy dose of kosher salt and several grinds of pepper and toss again. Pour them out into the cooking pan and sprinkle your choice of either fresh or dried thyme and/or rosemary evenly over the top. Reserve the wimpy veggies and prepare them the same way, just don't add them to the pan until much later in the cooking process.
Roast for an hour (plus or minus a bit, depending on the size of your veggie chunks), stirring after 30 minutes, and then again 15 minutes later at which point you will add your wimpy vegetables and cook for another 15 or so minutes. They are done when the edges are crispy and caramelized (like the top picture) and they are fork tender.

Tuesday, February 17, 2009

Valentine's Dinner 2009

The menu for this year's Valentine's dinner started with a salad of caramelized almonds, strawberries and blueberry stilton cheese on baby greens with a blush wine vinagrette dressing, followed by buttery potato crescent rolls, Alan's chicken creation and crash hot potatoes. We rounded out the evening with classic creme brulee, which I will do in a separate post. Alan tends to be pretty bold and fearless in mixing flavors and textures together. This was a last minute sort of a creation that sent him running to the store for sharp provolone while I got everything prepped. The results were delicious, interesting and different than your ordinary chicken dinner. He initially intended to stuff the chicken breasts, but found that we had too much good stuff to pull them shut...so we opted for just leaving the good stuff on top. Butterflying the breasts is important, because otherwise you'd have a huge thick hunk of chicken that would be overwhelming. We made enough to serve eight, but you can easily pare it down.

4 boneless, skinless chicken breasts, cut in half and butterflied

2 sweet italian sausages (we prefer Colossimo brand)

3 bell peppers (we used one each of red, yellow and orange), sliced in 1/4" rings

2 large shallots, cut in 1/4" slices

olive oil

1 T. brown sugar

salt and pepper to taste

4 sprigs fresh rosemary, leaves removed and minced, divided

2 lemons, zested and juiced, divided

2 T. honey

8 slices sharp provolone cheese

3/4 cup cream

1/2 cup parmesan cheese

Grill the sausages until they are crispy on the outside and cooked through, then slice into thin medalions. Saute the peppers and shallots in 3 T. olive oil over medium low heat with a lid on, stirring every few minutes. Sprinkle generously with salt and freshly ground pepper, and once they are very soft and lightly browned, sprinkle the brown sugar on and cook with the lid off for another few minutes until nicely caramelized.

Sprinkle each butterflied chicken breast piece with about half the rosemary and lemon zest, as well as some salt and pepper. Grill for 7-8 minutes on each side until cooked through. Baste the last couple minutes of cook time with a couple tablespoons of lemon juice mixed with the honey. Remove to a baking sheet.

On top of each chicken breast layer a generous helping of the caramelized peppers/shallots, several slices of sausage and a slice of provolone. Broil on low for 3-5 minutes, or until the cheese is melted and bubbly.

In the mean time, in a medium saucepan, heat up the cream until just simmering. Stir in the parmesan cheese, remaining couple tablespoons of lemon juice, remaining zest, remaining rosemary and a dash of salt and pepper to taste. Stir over medium low heat until the cheese is melted and well incorporated.

Serve chicken breasts with a generous drizzle of sauce.


Crash hot potatoes are so simple that even Rachel can make them! She had a great time smashing these.


8 medium sized red skin potatoes (about the size of a large plum works nicely)
olive oil
kosher salt
freshly ground pepper
fresh herbs if desired

Boil the potatoes until they are fork tender. Preheat the oven to 425 degrees. Drizzle a baking sheet with olive oil and spread it around with a brush (or your fingers if you're lazy like me) until it's evenly coated. Set the potatoes evenly around the baking sheet and use a potatoe masher to smash each one down about half way until they split open nicely. Generously drizzle more olive oil over each one, then sprinkle with salt, pepper and whatever herbs you want.

Bake at 425 for 30 minutes or until the edges and peels are a nice crispy golden brown. That's what makes these so awesome - the crispy edges!

Wednesday, July 16, 2008

What's for dinner?

Last night I made dinner for our good friends and neighbors since the hubby decided it was in his best interests to get his inflamed appendix out. For some reason, I always feel compelled to try out new recipes when I'm cooking for other people. Sometimes it comes out really well (like last night), and sometimes not so much. Murphy always hangs around my kitchen and it seems like at least one element of the dinner has to flop - last night it was my fool proof rolls. Oh well. The rest of it was really tasty, so I'm going to share my recipe finds with you.

The main dish was Spicy Honey Chicken, courtesy of Sara and Kate at The Daily Bite (please note that they've changed their address due to some crabby copyright laws - update your bookmarks accordingly). I actually purchased boneless skinless chicken thighs for the first time in my life for this recipe. Raw meat grosses me out, so I typically stick with the frozen pucks of chicken breast that don't resemble the actual bird. I was pleasantly surprised at how forgiving thighs are to barbecue. One of my big stresses in barbecuing chicken breasts is getting them cooked but not overcooked. Seems like the thin part of the breast is always dry and the thick part is still pink. The thighs cooked through nicely and were juicy and moist with a nicely caramelized exterior. Very worth the purchase, and I'm grateful to the fine fellas in the Harmon's butcher shop that took care of all the messy business for me. I cooked up 12 pieces of meat thinking mistakenly that I'd have leftovers to use later this week, but alas, they all got gobbled up. Ethan commented that it was a little "hot" for him, so I should probably go even easier on the cayenne next time I make it just for the kids' sake, but I thought it was just right.

Here's the recipe for you:

Spicy Honey Chicken

Rub:
2 t Garlic Powder
2 t Chili Powder
1 t Salt
1 t Ground Cumin
1 t paprika
1/4-1/2 t Cayenne pepper (depending on how hot you like it)
8 boneless skinless chicken thighs

*Just a quick note about the chicken. Even though I told you to use thighs, and it tastes better with thighs, I know some of you will ignore my advice and make it with breasts anyway because you’re afraid of chicken thighs. If you must, for best results pound the breasts thin, or butterfly them. Also you may want to drizzle with a bit of olive oil just before grilling. But seriously peeps, try the thighs.

Glaze:
6 T Honey
2 t Cider Vinegar

Combine first 6 ingredients (all the spices) in bowl and mix well. Use kitchen shears (or a pair of clean scissors) to trim off any excess fat from the chicken pieces. Toss chicken with spice rub to coat all sides well. Brush grill surface lightly with oil. Grill chicken a few minutes on each side, until cooked through.

Combine Honey and Vinegar in a small bowl, stirring well until combined. Brush mixture on chicken (both sides) in the final moments of grilling. Now because the glaze is sugar-based, you’ll want to turn the heat down so it doesn’t burn, but let it cook for a few minutes to caramelize.

If you don’t have a bbq, or just want to make it inside, cook it under the broiler and follow the same directions.

*****

What goes with chicken? Potatoes! Leigh Ann pointed me to this recipe on Pioneer Woman Cooks. I've bopped over to that site before, and found that she has some fabulous recipes. However, I get bogged down in her 30 photographs per recipe. My internet connection can't hack it. And it's difficult to sift all the way through it to get the actual recipe. Oh well. In any case, I haven't gotten over there on my own for a while, but when I saw Leigh Ann's posting about Crash Hot Potatoes, I just had to try them. I'm a total sucker for crispy tasty tidbits. These were fabulous! Even my I-only-like-my-potatoes-as-chips-or-fries boy liked them.

Crash Hot Potatoes

Baby new potatoes
Olive oil
Kosher salt
Freshly ground pepper
Minced fresh rosemary

Boil as many potatoes as you want in salted water until they are fork tender. I found that I could fit 20 golf ball sized potatoes on one baking sheet. Meanwhile, preheat the oven to 450 degrees and drizzle a generous amount of olive oil on a jelly roll pan (I brushed mine around with a pastry brush to make sure I wouldn't have any sticking spuds). Drain the potatoes and space them evenly on the pan. Use a potato masher to crush each potato. It doesn't have to be super flat. The more texture the better. I just did one mash, and left them about 1/2-3/4" thick. Brush olive oil over the top surface of each potato (again, be generous), and sprinkle with salt, pepper and rosemary. Bake for 20-25 minutes until they are crispy and golden brown around the edges. These are so awesome you'll find yourself snitching them right off the pan!

***
My kids' very favorite side dish is super simple. When they see me putting it together, I get to hear all sorts of compliments on my wonderful cooking and how much they love me. Therefore, I make it often.

Ethan and Rachel's Favorite Fruit Salad

6-7 cups cut up fresh fruit. Our favorite combination is pineapple, bananas, oranges, nectarines, mangos, strawberries and blueberries.
1 carton Yoplait vanilla yogurt

Toss it in a bowl and stir it all together. Yep, it's that simple.

Saturday, February 16, 2008

The way to a man's heart is through his stomach

Here's what we did for valentine's day. I always love an excuse to pull out the china. It belonged to Alan's grandmother.
First up on the menu was herb roasted cornish game hens, phyllo parmesan aspargus bundles and carrot basmati rice pilaf. For dessert I made a simple lemon cream and raspberry cake.

Here is the link to the rice pilaf, which I posted before.
Herb Roasted Cornish Game Hens
3 cornish game hens, thawed, rinsed and patted dry
1/4 cup butter, softened
1 T. minced fresh sage
1 T. minced fresh thyme
1 T. minced fresh rosemary
1/2 t. freshly ground pepper
1 t. kosher salt
2 T. olive oil
Preheat the oven to 450. Mix the butter and herbs together in a small bowel. Carefully separate the skin from the breasts of the hens and spoon in 1/3 of the butter mixture into that space into each one, spreading it out evenly. Place the hens on a rack in a shallow roasting pan and drizzle with the olive oil. Sprinkle with kosher salt and a few generous grinds of pepper. Roast at 450 degrees for 20 minutes, then reduce the heat to 350 and bake for an additional 40 minutes or until an instant read thermometer reads 170 when inserted into the thickest part of the chicken. Baste 2-3 times with the pan drippings during cooking. Remove to a platter and allow to rest for about 10 minutes, then use kitchen shears to cut each hen in half down the middle. Serves 6.
Parmesan Phyllo Asparagus Bundles
1 bundle of asparagus, rinsed, dried and ends snapped off
1 roll of frozen phyllo dough (package usually contains 2 rolls), thawed
1/2 cup parmesan cheese
1/2 stick of butter
kosher salt
freshly ground pepper
Preheat the oven to 375. Carefully unroll the phyllo, remove one sheet, then cover the remaining stack with a damp paper towel and plastic wrap. Cut phyllo sheet in half lengthwise and brush each strip with butter. Sprinkle parmesan cheese down the length of it, as well as a dash of salt and a few grinds of pepper. Lay three fat or four skinny stalks of asparagus at one end of a strip and roll up. Place seam side down on an ungreased baking sheet. Repeat until you run out of asparagus. Drizzle any leftover butter over the rolls on the baking sheet. Bake for 12-15 minutes or until the phyllo is golden and crispy and the asparagus is tender. Serve immediately.
Raspberry and Lemon Cream Cake
1 white cake mix, prepared according to package directions
2/3 cup lemon curd, divided
2 cups heavy whipping cream
1 cup powdered sugar
seedless raspberry jam or pie filling
Bake white cake according to package directions and allow to cool. I used a Wilton heart pan, and one mix fit in it. Slice a thin layer off the top, just enough to flatten it. Spread a thin layer of lemon curd over the cut surface, about 1/4 of a cup. Beat the cream until semi-stiff peaks form, then beat in the powdered sugar and lemon curd. Frost sides and top of cake, reserving some to pipe a border. Pipe or spoon raspberry filling on top, then pipe additional cream around the edges.

Monday, January 21, 2008

Random recipes from my weekend

January is so cold and dreary that I just had to make something springy last weekend. I love fresh salsas of any kind, and the options of how to serve it are limitless. This one was great in a tortilla with grilled chicken strips, shredded cheese and sour cream.

Super Fabuloso Southwest Salsa

2 Roma tomatoes, diced
1/2 cup diced green bell pepper
1 medium avocado, diced
1 medium mango, diced
1 small can of corn, drained (I prefer Del Monte brand)
1 cup of black beans, drained and rinsed
3 T. minced cilantro
juice of one lime
salt to taste
dash of garlic powder
dash of chipotle chili powder

Don't skip the chipotle chili powder! It's seriously one of my favorite spices. It's got a lovely smokey flavor and more kick to it than regular chili powder, and I use it all the time in my mexican cooking. If you wanted to kick up the heat in this, you could certainly add a minced jalapeno or annaheim pepper. I avoided onions or shallots (my preference), because I find that if you don't eat it right away or have some leftovers the onion flavor can get overpowering.

~~~~

For Sunday dinner, I did a turkey breast, caramelized roasted yams, and nutty broccoli and bacon with homemade rolls on the side. All of these are pretty simple and full of flavor.

Crockpot Turkey Breast

6 1/2-7 1/2 pound bone in turkey breast, thawed
2-3 sprigs fresh rosemary (or 1 t. dried)
4 cloves of garlic, peeled
kosher salt and freshly ground pepper
2-3 T. butter, optional
2 T. brown sugar

Place the turkey, breast side down, into an oval 6 quart crock pot. You may remove the skin beforehand, but I have found after making it both ways that this is unnecessary and that the skin comes off very easily once cooked. Toss in the garlic, rosemary, sprinkle a bit of salt and a few grinds of pepper over it. Cut the butter into pieces and distribute evenly around the turkey. Sprinkle the brown sugar on top. Put the lid on, set for either 6 hours on low or 3-4 hours on high and walk away. Bask in the wonderful aroma and avoid the temptation to open the lid.

Once it's done cooking, remove the turkey to a plate or cutting board, flip it over, and loosely tent with foil for 10-15 minutes while the juices settle. Use a turkey baster to suck out the juices from the pot. Usually there's about 2 cups. Melt a couple tablespoons of butter in a saucepan or large skillet, stir in 2 T. of flour, then slowly whisk in the pan juices and simmer until the gravy is the desired consistency. Correct the seasoning with salt and pepper as needed, and add a bit of water if needed to thin it. Serve immediately.

Caramelized Roasted Yams

3 large yams, peeled and cut into steak fry sized chunks
3 T. butter
3 T. brown sugar
1/2 t. cinnamon
dash of cloves and allspice

Preheat the oven to 400 degrees and spray a jelly roll pan with PAM. Melt the butter in a medium size bowl and stir in the spices and sugar. Add the yam chunks and stir until evenly coated. Spread out onto the baking sheet in a single layer. Bake for 35-45 minutes, stirring 2-3 times, until yams are cooked through and caramelized.

Nutty Broccoli and Bacon

3 cups bite size broccoli florets
1/4 cup bacon bits
1/4 cup salted cashews
salt, pepper

Steam broccoli either on the stovetop or microwave for 4-5 minutes, or until crisp-tender. Meanwhile, in a small non-stick skillet, saute the bacon bits until warm and crispy, then stir in the cashews and cook for one minute more. Drain the broccoli thoroughly and pour into a serving bowl. Stir the bacon and cashews in. Season with salt and pepper to taste.

Whole Wheat Honey Rolls

2 T. active dry yeast
2 c. warm buttermilk (today I substituted buttermilk powder and warm water)
1/2 cup butter, melted
1/3 cup honey
1 t. salt
1 t. baking soda
3 cups whole wheat flour (I used hard white wheat)
2 - 2 1/2 cups all purpose flour

Dissolve yeast in warm buttermilk. Buttermilk will appear curdled when heated to 110-115 degrees. If you elect to use buttermilk powder, dissolve the yeast in the same amount of warm water, then add the buttermilk powder in with the flour. Add butter, honey, salt, baking soda and whole wheat flour. Beat until smooth. Stir in enough all purpose flour to form a soft dough. Turn onto a floured surface and knead until smooth and elastic, 6-8 minutes. Place in a greased bowl, turning once to grease the top. Cover and let rise in a warm place until doubled, about one hour.

Punch dough down. On a lightly greased surface, divide into 4 equal parts. Divide each part into 6 equal portions and shape each into a ball. Place on a greased 15 x 10 pan, spaced equally. Let rise until doubled, about 30 minutes. Bake at 400 degrees for 12-16 minutes, or until golden brown. Delicious served warm with honey butter. Yields 24 rolls.

~~~
Just a reminder to the other people posting to add labels to your post. This enables people to click on categories listed on the sidebar to quickly find the desired recipe.

Wednesday, November 14, 2007

Carrot Basmati Rice Pilaf

This is a simple recipe that pairs well with a variety of main dishes. Tonight I served it with grilled kabobs composed of red pepper, zucchini, mushrooms and chicken, marinated in Italian salad dressing. My kids really like it, especially the pine nuts. Enjoy~

1 tablespoon olive oil
¼ cup finely chopped shallots
2 tablespoons pine nuts
1 cup uncooked basmati rice
2-3 carrots, grated
3 t. finely grated orange zest
¼ t. ground cardamom
1/8 t. crushed red pepper
2 ¼ cups chicken broth, heated
½ t. honey
1/8 t. salt

In large saucepan, heat olive oil over medium heat. Add shallots and pine nuts and cook 4-6 minutes. Add rice, carrots, orange zest, cardamom, and crushed red pepper and cook 2 more minutes, stirring frequently. Add warm chicken broth, honey and salt. Cover pan tightly and simmer for 12-15 minutes, until liquid is absorbed. I have also added ¼ cup golden raisins with the broth with excellent results, and have substituted chopped pecans when I was out of pine nuts.